Markus Hedlund

Developer / Photographer

Contact / GitHub / Instagram

Work With Me

Convert dates to elapsed time with Javascript

At Mimmin we know that every tiny detail can matter, and we always strive to simplify things and remove the unnecessary. This might be things like graying out certain parts of text to make others more evident.

A while ago I made a Javascript library that could convert absolute time to relative. This proved to be useful in many projects. When I implemented it in one of our latest projects I had to make some improvements. These changes made it to a patch, and now the official build is updated to version 1.1. Because of this I thought it would be good to make a small tutorial and show one way of using library.

Enhancing the readability of a log

One of the most useful things with this library is to convert absolute times (like 2009-01-10) into relative ones (like 6 weeks ago). I will in an example show how to convert a log with dates into one with relative dates.

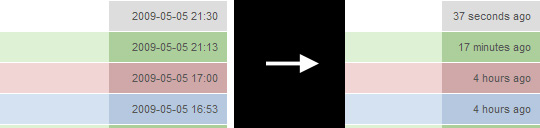
Above you can see the expected result of this tutorial. The original dates will be converted to time elapsed. I will be using the excellent Javascript framework jQuery, but this is not necessary since the Countdown Library is framework independent.

The markup for the log list is a follows.

<ul id="log">
  <li class="added">
    <div>An item has been added</div>
    <div class="date">2009-01-19 13:58</div>
  </li>

  <li class="removed">
    <div>An item has been removed</div>
    <div class="date">2009-01-19 17:15</div>
  </li>
</ul>

We now want to, using Javascript, step through every div element with class "date" in the ul element "log". We will then replace the date value with a "time passed" value. But for those users that are looking for the absolute date, we are going to add it to the "title" attribute of the div. Code as follows.

$('#log div.date').each(function(){
  var date = $(this).text();
  $(this).
    html(
      remaining.getString(-remaining.getSeconds(date), null, true) + ' ago'
    ).attr('title', date);
});

First we save the date value. Then we replace it with the return value from remaining.getString. The return value from remaining.getSeconds(date) is inverted because the function calculates time remaining, and we want the time that has passed.

The second parameter to remaining.getString is an internationalization (i18n) object, which I didn't alter since the output should be in english.

The third parameter is a flag that controls if the output should be exact, or if it is enough with only the largest unit. Example output is "2 hours, 1 minute, 5 seconds" versus "2 hours".

At last we add the saved date to the attribute "title" of the div element. This is all that is needed folks! But don't forget to include the Countdown Library using the snippet below.

<script type="text/javascript" src="http://www.labs.mimmin.com/countdown/remaining.js"></script>

If you have any questions, please leave a comment →

Unable to javascript-submit a form using jQuery?

Today we stumbled across the strangest error while making custom submit buttons. We are developing a site that won't depend on javascript for any functionality. This is the way you always should work to make a robust site, though it might sometimes get overlooked. The plan is to first make a functional version which we then extend using javascript.

Our custom buttons are added by a script looping through all button and input elements with the class "button" applied. After these elements an image link is created. An event is hooked on this link, which in case of click, pushes the original button, or if it is a submit button, submits the form.

This all worked very well for all forms but one. After too long time spent Googling and debugging, I discovered the solution! Because the original submit button was named "submit" it wouldn't submit the form. So after renaming it, all was good again! I think it behaves this way because the submit element replaces the submit() function of the form.

Solution: Never ever name a form field "submit", it might just break any javascript!

<!-- BAD -->
<input type="submit" name="submit" />

<!-- GOOD -->
<input type="submit" name="continueButton" />

PHP: Creating a singleton class

The singleton pattern has both pros and cons. You should only use it if the class never has to be instantiated, as often is the case with database, registry and debug classes. The advantage is never having to manage instances; the class is easily accessible from everywhere. Click through to see examples.

class output
{
    private static $_instance;

    private function __construct() {}
    private function __clone() {}

    /**
    * @desc Get singleton instance
    * @return output
    */
    public static function &getInstance()
    {
        if (!isset(self::$_instance)) {
            self::$_instance = new self();
        }

        return self::$_instance;
    }

    public function println($text)
    {
        print "$text<br />";
    }
}

Let's dissect the code, shall we? The function getInstance creates, if neccesary, an instance of the class and saves it to the static, private parameter $_instance. It then returns a reference to the saved instance, hence the ampersand.

If your IDE supports code suggestions, be sure to keep the function comment up-to-date, especially @return. This will tell your editor what it should expect to be returned from the function, and will then know what functions and parameters to suggest.

To prevent anyone from making more instances of our class, we declare the functions __construct and __clone as private.

Singleton is as simple as that! Now how do we use this class? Example below.

// Oneliner
output::getInstance()->println('print to the screen');

// We may borrow the instance, and since it is
// returned by reference, we always work on the 
// same instance
$output = output::getInstance();
$output->println('text text');
$output->println('more text');

That's it! If you have any question, don't hesitate →